
Starbucks mini-sling

by Linda Theil

A bagmaker from the Kandou Patterns Community on FaceBook posted a bag featuring the Kandou "Mini-Traveler Sling" pattern using a Starbucks coffee bag as part of the fabrication. I am from Pittsburgh, so perhaps it comes naturally that I am intrigued by the use of iconic advertising in works of art, so I asked Alisa to please buy me some Starbucks coffee so that I could sew with the bags. I am also a fan of this slim, six-by-twelve-inch sling pattern that has three pockets and no inside!

Alisa was particularly fond of the "Brown Sugar Cinnamon" limited edition bag, so I used this pink and gold bag for my first Starbucks sling.

For the body of the bag, I used a cotton from the "Seedlings" collection by Katarina Rocella for Art Gallery Fabrics. The lining is Roccella's "Stacked Stones" design from her "Abstract Art" collection, also for AGF.

"Stacked Stones" from "Abstract Art" collection by K. Roccella for AGF

The strap is a serindipidously perfect, color-match, twill ribbon from the packaging of a pajama set by Barefoot Dreams. I doubled the length of twill and stitched it down the sides to make a soft, but strong, cross-body strap,

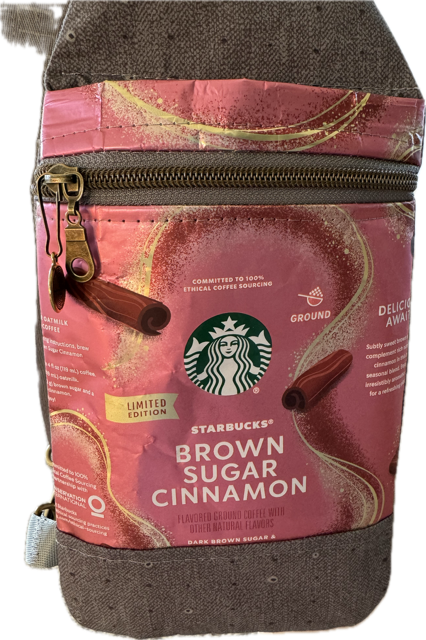
The Starbucks coffee bag is made of a paper and plastic laminate with a thin aluminum lining. The packaging was created to protect the contents from oxygen, so the bag is impervious to air. I assume that making the fabric impermiable also makes it very strong, and so a realistic option for handbag material.

To aid in protecting the coffee, each bag has a little button that I thought I would have to work around; but I discovered with gentle but persistent encouragement, the button popped right off without damaging the bag. Even if the coffee-bag material weren't so great for handbag-making, the Starbucks logo makes a piquant talisman for carrying a credit card and phone.

To prepare the Starbucks coffee bag for sewing, I interfaced it with a Pellon extra-firm stabilizeer. Since I couldn't use heat to fuse stabilizer to the fabric, I used a spray-on adhesive. This was not ideal because the aerosol caused the bag material to curl up, making adhesion difficult. Self-adhsive fleece was the suggested option for interfacing, but I didn't have any so tried the spray adhesive. I'll try the fleece next time.

In order to highlight the Starbucks iconic artwork, I made a change in the bag design to eliminate a diagonally inserted, zippered pocket. and replace it with a horizontal zipper insertion. I re-drew the pattern piece that would be cut from the coffee bag material, and cut it so that I could insert the zipper in the standard way, instead of the diagonal insertion. This process had the additional benefit of making the zippered pocket on the front of the bag roomier, and easier to use.

To sew the bag, I used a teflon foot on my machine, but I'm not sure I needed it since the pattern piece cut from coffee bag fabric doesn’t require a lot of stitching. For topstitching around the zipper insertion, I just used a regular zipper foot, and that worked pretty well.

Kandou "Mini-Traveler Sling" back with vertical zippered pocket

Kandou "Mini-Traveler Sling" front with horizontal zippered pocket
and large slip pocket.

Full length slip pocket on front of Kandou "Mini-Traveler Sling"lined with "Stacked Stones" design from K. Roccella's"Abstract Art" collection for AGF

Bag makers can view "Kandou Patterns Mini Traveler Sling Tutorial" on the Oklaroots YouTube channel.


Update: May 7, 2025

I just finished my second Starbucks sling; this one uses the bag from Starbucks French Roast, Mora faux leather, and 1.5-inch "Wheat" cotton webbing from Penny Supplies.


Comments

Casey Hans said…
Love this, Linda!

Popular posts from this blog

Scrappy log cabin blocks

by Linda Theil Scrappy Log Cabin quilt block by Linda Theil  Next month the Greater Ann Arbor Quilt Guild will host a virtual quilt-along to make quilts for the SafeHouse Center womens' shelter in Ann Arbor, Michigan. One of the suggested blocks to make at the event is a Scrappy Log Cabin suggested by GAAQG member and artist Mary Bajcz. I love the Log Cabin block design and decided to get a head start on next month's event by organizing my materials and develping a process for making my Scrappy Log Cabin blocks. I began by watching Mary's YouTube video: "Scrap Quilt Strategy: The Log Cabin Technique" , and many others available on the topic. What a variety of approaches!   I'm not much of an improvisor and this is the first time I've tried the scrappy approach to quilt making. So It was quite an adventure for me. I pulled out my scrap bin and began sorting for lights and darks. After looking at many videos, I decided to work with a central square of 2.5-i...

Notes on Purl Soho Cross-back Apron pattern

Purl Soho Cross-back Apron, regular sized, front view Purl Soho Cross-back Apron, regular sized, back view by Linda Theil This is the Purl Soho Cross-back Apron featured on their website at  https://www.purlsoho.com/create/2015/11/20/cross-back-apron . Their page includes complete directions for making this one-size-fits-most apron with large, side-pockets and cross-back straps. This retro apron is so nicely made and looks so much like the apron my grandma wore in the Nineteen-fifties that I had to make one for my friend who appreciates the nostalgia and the beauty of this design. Although this apron pattern, as published, can adjust to several sizes from 2-10; I also made a larger option, adjusting the width of the pattern pieces to accommodate up to size 16 and up. Size adjustment may also be made by varying the length of the straps. These notes are a record of my experience with the pattern, and should only be viewed as commentary; your results may vary. ...

Advent star

by Linda Theil Alisa made me a beautiful Advent calendar long ago and every year she fills it with goodies in anticipation of the Christmas holiday. Last Christmas, every pocket contained two rolled-up strips from a "jelly roll" precut package of "Holiday Florish Festive Finery" by Robert Kaufman. I wanted to use the fabric right away and not allow my gift to disappear into my tub of holiday galore. After searching my patterns for a block that could be made with "jelly-roll" strips, I decided to redraw a "Christmas Star" block in a size that would use the 2.5-inch-wide "jelly roll" strips. This redraw resulted in a 10-inch block before finishing, and not including the 2.5-inch sashing I added later. For construction I used the method described by Brigitte Heitland in her "Christmas Star" pattern. This was a free pattern that I no longer find available through her website. The block looks very intricate, but Heitland's con...