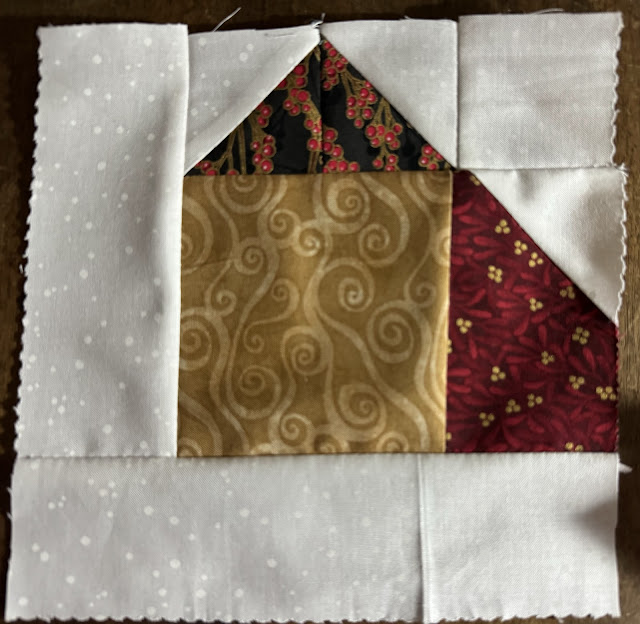
Snowmobile barn quilt block


by Linda Theil

Alisa gave me Girardelli chocolates and pre-cut fabric as tiny gifts in my 2024 Advent calendar celebrating each December day leading up to the holiday celebration.

By Christmas I had an entire "jelly-roll" of 2.5-inch-wide strips of fabric from the "Holiday Flourish-Festive Finery" collection from Robert Kaufmann fabrics. I pulled some background and a blender from my stash and started researching block options so that I would be ready to sew once holiday festivities were over.

One of the options I explored is a beautiful book, I Love House Blocks: 14 Quilts from an All-time Favorite Block, published by Martingale & Co. in 2017. A house block with a shed-like addition called "Little Country Home" caught my eye. The layout was adaptable to my 2.5-inch-wide strips, so I made a sample block as proof of concept.

The block has a barn-like quality that I liked, so in  honor of my snowmobile-builder son, I decided to put a snowmobile in the barn. 

  • I searched the Internet for a snowmobile icon that might be adaptable for my use.
  • When I found a suitable design, I sized the image in Pagemaker and printed out several sizes to use as patterns for my applique.
  • I backed a dark fabric from my scrap basket with Heat n Bond brand. iron-on adhesive.
  • I clipped my pattern on top of my adhesive-backed fabric, and cut out the applique with a small, sharp pair of scissors.
  • Then, I used an iron to fuse the snowmobile applique to my pieced barn. 


It occurs to me that you could add any selection of personal icons, holiday icons, or other images to each barn block to create a themed quilt.

After adding pieces of background to border the entire barn block, I prepared my pieced block with batting and iron-on interfacing as a backing, and used my walking foot to closely quilt the entire block. I did not stitch the small applique around its outline, but attached it with only the close lines of stitching used to quilt the block. Then I spray glued a stiff backing to the quilted block and zig-zag stitched around all four sides of the block to make a vignette suitable for display.


I don't know if I will use this block to make an entire quilt with the Robert Kaufmann holiday fabric unless I figure out a way to incorporate more of the printed strips into the quilt, but I really enjoyed playing with this elegant little block and will probably continue to experiment with it.
Diagram of block as sewn for this project


Comments

Cathy said…
You make me smile! Once again, you are so amazing---who else would have thought to do that!! What a treasure for Paul!

Popular posts from this blog

Notes on Purl Soho Cross-back Apron pattern

Purl Soho Cross-back Apron, regular sized,  front view Purl Soho Cross-back Apron, regular sized,   back view by Linda Theil This is the Purl Soho Cross-back Apron featured on their website at  https://www.purlsoho.com/create/2015/11/20/cross-back-apron . Their page includes complete directions for making this one-size-fits-most apron with large, side-pockets and cross-back straps. This retro apron is so nicely made and looks so much like the apron my grandma wore in the Nineteen-fifties that I had to make one for my friend who appreciates the nostalgia and the beauty of this design. Although this apron pattern, as published, can adjust to several sizes from 2-10; I also made a larger option, adjusting the width of the pattern pieces to accommodate up to size 16 and up. Size adjustment may also be made by varying the length of the straps. These notes are a record of my experience with the pattern, and should only be viewed as...

Plover Pouch adaptation

by linda Theil I made several adaptations to Noodlehead's "Plover Pouch" for Emerson's birthday present. I had previously given her a medium-sized "Plover Pouch" that she added a cross-body strap to, so thought I'd make her a larger, sturdier bag with the crossbody strap built in. I modified the zip-end detail featured in the pattern to allow me to insert the strap ends into the top of the gusset. The "Plover Pouch" pattern includes three sizes with the largest measuring 12 x 7.5 x 4-inches. For the large bag, I used "Hedgehog Hollow" cottons by In the Beginning fabrics for the front and back exterior panels and the lining. I machine quilted the front and back panels to increase the stiffness of the bag, and I interfaced the lining with iron-on fleece as well. That was actually an accident, but the fleece interfacing in the lining worked out pretty well. The side-panel and bag-base gusset are made of Mora faux leather. I used a #5 dou...

Notebook cover from Arabesque

by Linda Theil I just finished making the "Crafted Life Companion" notebook-cover designed by Australian Ali Phillips of Arabesque Scissors . I've made several of Phillips' patterns and have come to experience Phillips as creating at the same stratospheric level as English designer Diane Spencer Ogg for brilliant design innovation and attention to minute specificity in their patterns. Both creators are also highly professional and skilled presenters in their step-by-step demonstration videos for every design. Please see Phillips' video at the end of this post. The Arabesque notebook cover is designed to fit an A5 notebook size, and includes a sleeve for notepads up to 4 x 8-inches. Other pocket options are included in the pattern -- most of which I left out in my first version. I did take advantage of a marvelously useful innovation Phillips provided: a beautifully designed "coloring page" that helped enormously to keep all my pattern pieces organized....