
Friendship Circle motif

by Linda Theil


I saw this block on my friend Kathy Schmidt's Quirks, Ltd. weblog and asked her for the directions. She pointed me to The Joyful Quilter tutorial. This pattern is one of those complex-looking, but easy to sew, Twenty-first Century blocks made by sewing a basic block, cutting the basic block, then sewing the pieces together with other blocks sewn and cut in the same way. I've seen several patterns for a complete quilt using this block offered for sale on the Internet.

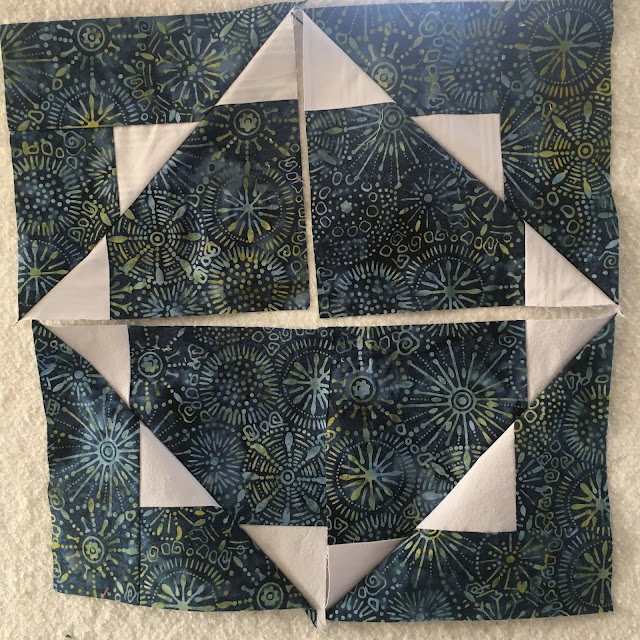
Although it sounds complex, this technique makes creating a multi-pieced block very fast and easy. I like this block because when sewn in multiples, an unexpected circle appears in the design, as shown below.


I put my blocks together in two colors, although multi-colored blocks are beautiful and show a lot of movement. Four blocks cut and sewn in this way make a single circle motif. To make a 16-inch finished, four-block circle motif, each of the four blocks requires three pieces cut from precut-squares, scraps, or yardage:
  • a 6.5-inch square,
  • a 6.5 x 3.5-inch rectangle,
  • and a 3.5 x 10-inch rectangle.

I tried the design, using just two colors. To make the basic block, choose one short and one long rectangle of one color to sew to a square of a highly     contrasting color. Sew the short rectangle of one color, to the square of a highly contrasting color. Then sew the long rectangle of the same color as the short rectangle to the side of the rectangle created by the two sewn pieces. Repeat, reversing the positions of the light and dark pieces. These two mirrored-color blocks will make one-half of a circle motif. To form a complete circle motif, make two sets.


After sewing this basic block, trim the basic block to nine-inches square.

To complete the block, turn each basic block on the diagonal. Put your ruler perpendicular, through the top and bottom points of the block. Make sure your ruler delineates a small arrow in the center of one-half of your block. This is very important because it is easy to mistake your placement and cut from point-to-point through the center of the fabric points created by your piecing, ruining your block for this design. Cut the block in half using a rotary cutter.


Cut both sets of pieced blocks, then rearrange into new blocks showing one corner and one diamond shape, revealing a line of contrasting triangles between, as shown below. Sew all four blocks in this configuration, then arrange with squares meeting in the center, and with the corners creating all four corners of your circular motif, as shown in subsequent photos below:


Seam the top two pieces vertically, then the bottom two pieces vertically. Then sew the top and bottom pieces together with a horizontal seam.

If you make eight blocks, you can arrange all the same centers and corners together to create a contrasting star -- eight blocks will make one light star and one dark star.

Update March 19, 2021

Finished, flannel-backed quilt. Long-armed by Laura Jarvis of KootsieQuilting in Stockbridge, MI.


Resources

Quirks Ltd. "Wrapping it up" Jan. 25, 2121 at https://quirksltd.wordpress.com/2021/01/25/wrapping-it-up-already/  by Kathy Schmidt, Tecumseh, MI

The Joyful Quilter "Tutorial Tuesday -- Magic Star Tutorial with Tiffany" March 24, 2020 at https://thejoyfulquilter.blogspot.com/2020/03/magic-star-tutorial-with-tiffany.html  by Joyful Quilter, Hillsborough NC

Comments

Cathy said…
Beautiful quilt. You always do such a great explanation!

Popular posts from this blog

Notes on Purl Soho Cross-back Apron pattern

Purl Soho Cross-back Apron, regular sized,  front view Purl Soho Cross-back Apron, regular sized,   back view by Linda Theil This is the Purl Soho Cross-back Apron featured on their website at  https://www.purlsoho.com/create/2015/11/20/cross-back-apron . Their page includes complete directions for making this one-size-fits-most apron with large, side-pockets and cross-back straps. This retro apron is so nicely made and looks so much like the apron my grandma wore in the Nineteen-fifties that I had to make one for my friend who appreciates the nostalgia and the beauty of this design. Although this apron pattern, as published, can adjust to several sizes from 2-10; I also made a larger option, adjusting the width of the pattern pieces to accommodate up to size 16 and up. Size adjustment may also be made by varying the length of the straps. These notes are a record of my experience with the pattern, and should only be viewed as commentary; y

Pencil pods

 by Linda Theil I started school in 1953 in Miss Stump's morning kindergarten class at Neville School in Pittsburgh, Pennsylvania. I was ashamed of my knobby knees, scared of the Bad Chair, and delighted in making silver bells with foil that sealed the pint bottles of our daily milk ration.  Every year my mom bought me a new pencil box to start the school year. I loved my pencil box with its specialized compartments and equipment. Although I never understood the purpose of the colored plastic protractor with its tiny gradations, I delighted in the #2 Eberhard Fabers, Prismacolor pencils, Crayolas, Westcott ruler, Pink Pearl eraser, pencil sharpener, and compass. I was ready for school! That's why I was so happy when the local intermediate school district began their  "Backpacks for Kids" project -- giving Livingston County, MI students backpacks full of school supplies. Robin Schutz of Great Start Livingston said: "LESA staff started this project in 2002 with ju

Holiday weekender

  by Linda Theil Alisa's always cleaning house and often asking me if I want some item I'd given her before she sent it to a new home. I couldn't refuse the holiday-print, round table cloth I had bordered in red pom-poms forty years ago, even though she had slit the cloth to the center so that she could use it as a tree skirt. I decided I would make a holiday-getaway bag from the salvageable remnant. The olive-drab faux waxed canvas I ordered on sale looked really great with the old print. I used Diane Spencer-Ogg's outstanding "Escape Pod Travel Collection" patterns. Pictured below: The holiday themed “Weekend Bag” and "Travel Clutch" in olive-drab faux waxed-duck canvas from Sally Tomato , vintage holiday print exterior and interior, and accents of Mora bordeaux faux leather from Emmaline Bags . Pattern and video tutorial "Escape Pod Travel Collection: Weekend Bag and Travel Clutch" by Diane Spencer-Ogg. Weekend Bag front Weekend Bag bac