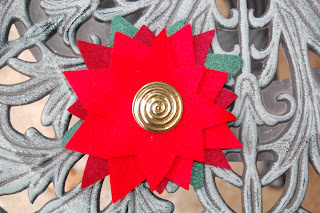
I saw these cute felt pins in a holiday catalog and wanted to try to make some. The ones in the catalog were all different. Some were layers of felt cut in the shape of petals, some were loops of felt that looked like crysanthemums, some were rolls of felt that looked like rosebuds. Some were a little of each. I made this poinsettia as a trial effort, but it seems to me that you could while away a winter afternoon cutting shapes, embellishing and building flowers to your heart's content. For ideas to spark your creativity, search for "felt flower pins" on Etsy.
Equipment:
Needle
Scissors
Materials:
Standard copy paper for pattern cutting
Heavy felt squares or yardage, as desired (For poinsettia buy dark green, burgundy, and bright red.)
Variety of large (1-1/4 inch diameter), fancy buttons or large beads for flower center
Beads and sequins (if desired)
Large safety pins or stick pin with safety cap (clutch), or jewelry finding pin back available from jewelry finding stores
Buttonhole twist thread to match felt colors used
Embroidery twist for embellishment if desired
Directions:
- Cut 5-inch and 4-inch squares of paper. Fold paper and cut petals to make pattern for flowers. (For poinsettia, make pointed petals on pattern with eight petals)
- Choose felt and trace petals onto felt. (For poinsettia, cut one dark green, one burgundy, and one bright red five-inch flower, and one bright red four-inch flower.) Cut 1-inch squares of felt scraps to layer between petal pieces and cut 1-inch circle (dark green for poinsettia) to cover stitches on back of flower pin.
- Embellish each petal piece with beads, sequins, or embroidery before assembly. Do not embellish center of 5-inch petal pieces because centers will be covered with layered petals. Four-inch petal piece may be embellished everywhere but center where button will be sewn.
- Layer petal pieces. (For poinsettia layer 5-inch green, then square spacer, 5-inch burgundy, spacer, 5-inch bright red, spacer, 4-inch bright red.)
- Thread needle and using double thread stitch through all layers twice leaving a long tail on back to use to tie knot securing stitches.
- Choose button and sew on using the same threaded needled, but do not stitch through all layers of felt. Secure on back by several small stitches and cut thread. Note: a vintage broach would also make a pretty center.
- Cover stitching with 1-inch round felt piece (dark green for poinsettia) and using a couple stitches secure to back of flower through the bottom layer of felt.
- Using the same threaded needle sew a large safety pin to the round felt piece by stitching several times through the circle on the end of the pin, or sew on a jewelry finding pin back. Alternatively, use a hat pin with safety cap (clutch) to secure flower to clothing.


Comments