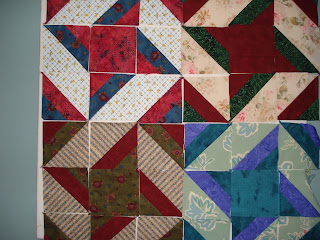
I've been working on the "Hot Cross Stars" a Cut Loose Press design by Kathy Seal of The Quilt Patch in Tecumseh, Michigan using the 4.5-inch 90-degree double-strip ruler by Creative Grids.. Kathy Seal demos this process on YouTube at "Quilting Tutorial: Hot Cross Stars and More Double-Strip Ruler Quilts" . This process is another of those techniques that transforms fabric quickly by stitching fabric strips together then cutting the stitched strips using the special ruler. You end up with patches featuring three fabrics that can be arranged in various design blocks. The block I made is Kathy Seal's "Hot Cross Stars".
I made these scrap patches using fabrics from my stash and displayed here on my design wall. The technique is very, very fast and easy and so much fun!
Close up of four "Hot Cross Star" patches.
Close up of single patch (red and blue).
Close up of single patch (red and green).
I'm using the patches to make totes as goodie bags for a friends' trip to the Shipshewana Quilt Festival June 26-29, 2013. I used the Appleton Dance Tiny Totes pattern by sizing the pattern up so that I could use a 17-inch "Hot Cross Star" patch for the front of each tote. Fabric requirements for the enlarged tote and simple instructions are included below.
Here is the prototype Hot Cross Star tote. It measures approximately 17 x 24-inches (although this prototype tote is closer to 26-inches long because I made the bottom piece longer than subsequent totes).
Creative Grids http://www.creativegridsusa.com/products.cfm?item_num=CGRDBS90&ref=c
The Quilt Patch https://www.facebook.com/thequiltpatch/posts/161917547287090 and https://www.facebook.com/thequiltpatch
Creative Grids video http://www.youtube.com/watch?v=jggXFs4lZjU&feature=youtu.be
Shipshewana http://www.shipshewanaquiltfest.com/
Appleton Dance Tiny Totes pattern http://appletondance.blogspot.com/2011/11/tiny-totes.html#.UZ4007WkqyA
I made these scrap patches using fabrics from my stash and displayed here on my design wall. The technique is very, very fast and easy and so much fun!
Close up of four "Hot Cross Star" patches.
Close up of single patch (red and blue).
Close up of single patch (red and green).
I'm using the patches to make totes as goodie bags for a friends' trip to the Shipshewana Quilt Festival June 26-29, 2013. I used the Appleton Dance Tiny Totes pattern by sizing the pattern up so that I could use a 17-inch "Hot Cross Star" patch for the front of each tote. Fabric requirements for the enlarged tote and simple instructions are included below.
Materials for “Hot Cross Stars” tote
- 17 x 17-inch “Hot Cross Stars” quilt block (or fussy cut feature fabric, or other 17-inch block) for tote front
- 17 x 21-inch coordinating fabric for tote back
- 4 x 17-inch coordinating fabric for tote front bottom.
- One yard woven cotton belting in coordinating color (Beige, white, and black are widely available in stores that carry fabric and notions as well as online; colors are also available.) Cut in two 18-inch pieces for tote handles. (Or make handles from coordinating fabric.)
- 1/2-yard third coordinating fabric for lining – cut into 2 pieces 17 x 21-inches each
- 17 x 17-inch iron-on quilt batting for back of quilt block that is the front of your tote
- 17 x 21-inch piece of Pellon Décor Bond iron-on interfacing for tote back
- 17 x 4-inch piece of Pellon Décor Bond iron-on interfacing for tote front bottom piece sewn onto bottom of tote front quilt block
- Coordinating thread (I used a light or dark “mud” for all projects.
- Coordinating thread in color for topstitching tote top.
I used a size 14 top-stitching needle to sew throughout the project and put in a new needle at the beginning of each project.
For complete tote-making instructions with photos, see TinyTotes/Appleton Dance Nov. 22, 2011. Tote construction takes about two to 2.5 hours.
The basic tote-making process is as follows:
- To prepare fabrics, iron batting to tote front quilt block. Iron Décor Bond to one tote back and tote front bottom pieces.
- Stitch tote bottom piece to bottom of tote front.
- Stitch tote handle to top of tote front forming a U-shaped loop with the top edges of the “U” five inches from each side of the tote with raw edges of belting aligned with raw edges of the top of the tote. Repeat for tote back.
- Stitch lining top to tote top, right sides together, along top edge with tote handle sandwiched between top and lining. Repeat for tote back.
- Shape tote bottom by sewing 2-inch diagonal seams across side seams on bag bottom. (See Tiny Totes for photos of process.) Repeat for lining. Trim seams to 1/4-inch.
- Layer tote back and lining piece on top of tote top and lining piece, right sides together. Pin together. Stitch tote top and lining to tote back and lining along all four edges leaving a six-inch hole in lining bottom seam to turn the tote. REMOVE ALL PINS.
- Turn.
- Topstitch opening in lining closed along edge of opening.
- Push lining into bag. Press evenly along top edge using steam and a wood block to flatten edge.
- Use a decorative stitch to topstich completely around top of bag about one-quarter inch from top edge.
- Press.
- For complete instructions with photos (of smaller totes, but process is same), see: Tiny Totes/Appleton Dance Nov. 22, 2011
Creative Grids http://www.creativegridsusa.com/products.cfm?item_num=CGRDBS90&ref=c
The Quilt Patch https://www.facebook.com/thequiltpatch/posts/161917547287090 and https://www.facebook.com/thequiltpatch
Creative Grids video http://www.youtube.com/watch?v=jggXFs4lZjU&feature=youtu.be
Shipshewana http://www.shipshewanaquiltfest.com/
Appleton Dance Tiny Totes pattern http://appletondance.blogspot.com/2011/11/tiny-totes.html#.UZ4007WkqyA


Comments