
Goose pockets


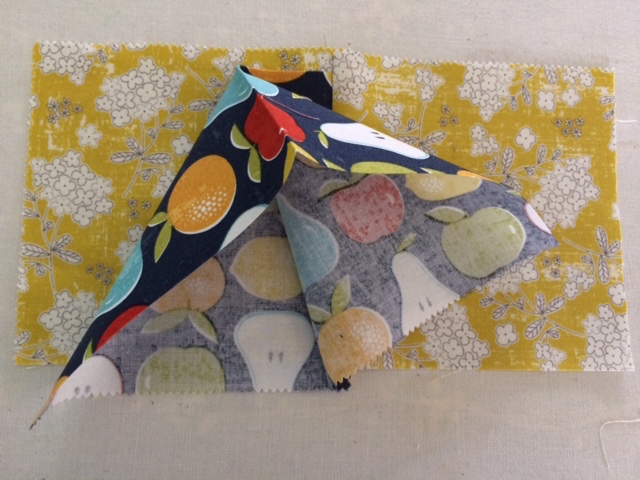
 Linda Theil's sample "Goose Pockets" in Moda's "Garden Fruits" line designed by Tim and Beck -- note the bottom geese were not inserted properly in the fabric sandwich and so will have their points eliminated when they are sewn into a hanging. Please see instruction below to avoid this problem in your goose pockets.

I watched Jenny Doan's "One Seam Flying Geese" tutorial on the Missouri Star Quilt Company YouTube channel and was intrigued by the little pockets her one-seam method created on the surface of her work. I thought the pattern would be cute made up as an Advent calendar; and sure enough, Doan included in her video an Advent calendar that she created using her one-seam Flying Geese method. Doan also provided a four-color PDF of a "Christmas Bucket List" of little cards to print out and tuck into each pocket.

I thought I remembered how Doan made her geese from the video, but discovered it wasn't as easy as I thought and my first goose had two flaps but no wings! My second attempt gave me geese that were sure to lose their points when they were seamed together.

So I decided to work out a step-by-step method that I could refer to whenever I decided to make these one-seam, goose pockets. 

Note: If you don't want pockets in your quilt or hanging, just stitch the hypotenuse closed when you quilt the project.

Goose Pockets

Cut two five inch squares of fabric in your choice of background color. The fabric I used is from a layer cake of 10-inch squares in the "Garden Fruits" line by Tim and Beck for Moda.

Cut one 5 x 10 inch rectangle of contrasting fabric in your pocket color choice.

Lay one five inch background square on your sewing table, with the right side of the fabric facing up.

Fold your pocket rectangle in half with right sides facing out to make a five inch square.

With the fold facing the bottom of the background square on your table, place your folded pocket rectangle on top of the square with the fold placed 3/8 inch from the bottom of the background square. Note: this will make the pocket extend past the top edge of the background square. You will trim this off later.

Place your second background square, right side down (with the wrong side of your background fabric facing up) on top of first square, sandwiching the folded rectangle between the two five-inch squares.

Visual of goose-pocket sandwich. (Note that the bottom edges of the two background squares meet evenly with the pocket sandwiched 3/8-inch up from the bottom of the square.)

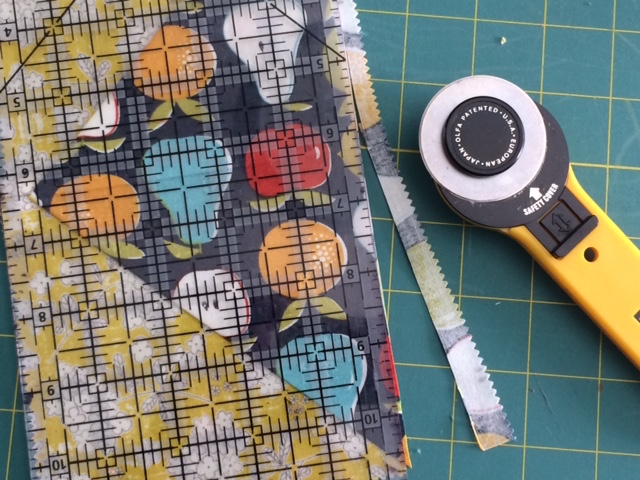
Place pins into your goose-pocket sandwich with the tips pointing to the left hand side of square. The pins are pointing to the edge along which you will sew a 1/4 inch seam.

Stitching one-seam, goose-pocket sandwich.

Open out and press.
Note: In this picture, the folded edge is at the top of the photo. 

Lift one edge of the folded rectangle pocket, and pull it open.

Keep lifting until . . .

. . . the raw edges of the fabric line up along the bottom and the goose pockets are formed.

Trim to even the bottom of the pocket, making the block five inches wide.


Completed Flying Geese block with pockets, made with one seam. Note that the seam allowance at the top of the block will insure the point of the wings won't get bitten off when you sew your blocks together.

Comments

Kathy said…
I have seen this method many years ago. I think Ricky Tims was showing it. However, your tutorial was awesome and really details how to be successful. Love it. Thanks!!!

Popular posts from this blog

Notes on Purl Soho Cross-back Apron pattern

Purl Soho Cross-back Apron, regular sized,  front view Purl Soho Cross-back Apron, regular sized,   back view by Linda Theil This is the Purl Soho Cross-back Apron featured on their website at  https://www.purlsoho.com/create/2015/11/20/cross-back-apron . Their page includes complete directions for making this one-size-fits-most apron with large, side-pockets and cross-back straps. This retro apron is so nicely made and looks so much like the apron my grandma wore in the Nineteen-fifties that I had to make one for my friend who appreciates the nostalgia and the beauty of this design. Although this apron pattern, as published, can adjust to several sizes from 2-10; I also made a larger option, adjusting the width of the pattern pieces to accommodate up to size 16 and up. Size adjustment may also be made by varying the length of the straps. These notes are a record of my experience with the pattern, and should only be viewed as commentary; y

Pencil pods

 by Linda Theil I started school in 1953 in Miss Stump's morning kindergarten class at Neville School in Pittsburgh, Pennsylvania. I was ashamed of my knobby knees, scared of the Bad Chair, and delighted in making silver bells with foil that sealed the pint bottles of our daily milk ration.  Every year my mom bought me a new pencil box to start the school year. I loved my pencil box with its specialized compartments and equipment. Although I never understood the purpose of the colored plastic protractor with its tiny gradations, I delighted in the #2 Eberhard Fabers, Prismacolor pencils, Crayolas, Westcott ruler, Pink Pearl eraser, pencil sharpener, and compass. I was ready for school! That's why I was so happy when the local intermediate school district began their  "Backpacks for Kids" project -- giving Livingston County, MI students backpacks full of school supplies. Robin Schutz of Great Start Livingston said: "LESA staff started this project in 2002 with ju

Holiday weekender

  by Linda Theil Alisa's always cleaning house and often asking me if I want some item I'd given her before she sent it to a new home. I couldn't refuse the holiday-print, round table cloth I had bordered in red pom-poms forty years ago, even though she had slit the cloth to the center so that she could use it as a tree skirt. I decided I would make a holiday-getaway bag from the salvageable remnant. The olive-drab faux waxed canvas I ordered on sale looked really great with the old print. I used Diane Spencer-Ogg's outstanding "Escape Pod Travel Collection" patterns. Pictured below: The holiday themed “Weekend Bag” and "Travel Clutch" in olive-drab faux waxed-duck canvas from Sally Tomato , vintage holiday print exterior and interior, and accents of Mora bordeaux faux leather from Emmaline Bags . Pattern and video tutorial "Escape Pod Travel Collection: Weekend Bag and Travel Clutch" by Diane Spencer-Ogg. Weekend Bag front Weekend Bag bac