Pyramid Pouch
I recently wanted to make a gift bag for some Troll beads I
gave to Alisa for her birthday and thought of the Pyramid Pouch I posted in this blog several years ago. When I went to the post I discovered that I had
linked to a source for the description of how to make the pouch, but the
directions were not very clear, so I thought I’d do the how-to with photos for
this blog to make assembly easier.
You can make the pouch in whatever size you like, as long as
you begin with a piece of fabric twice as long as it is wide and with a zipper
that is as long as your fabric width. For example, if your fabric measures 8 x
4 inches, you need a zipper that is 4 inches long.
The seaming is very simple, but hard to describe. The pouch
has only three seams: bottom, side, and zipper installation. I’ve done my best to describe the process below,
but you may wish to practice with a piece of paper and tape a few times to get
the overall picture before beginning to seam your pouch.
The pouch shown in the directions finishes at 5.5-inches on
a side from fabric pieces that are cut 6-inches by 12-inches. Note: The larger your bag, the easier it will
be to handle and create. For very large bags, or very small bags, purchase
zipper by the yard. In a large bag using zipper by the yard, you may wish to
put two pulls on your zipper so that it may be unzipped from either direction.
Materials
Exterior fabric twice as long as it is wide
Matching or coordinating lining fabric of the same size
Interfacing of iron-on batting or Pellon Décor Bond of the
same size
Coordinating zipper as long as the width of your fabric plus
about one inch for ease of installation
5-inches coordinating grosgrain ribbon for loop
Matching thread
Equipment
Zipper foot
Directions
Install zipper along both short edges of exterior fabric,
creating a tube connected by the zipper.
(At top, unzip zipper to finish installing tape at end of zipper, and leave unzipped to install second side of zipper. Zipper tape should be even with fabric edges on both sides.)
Zip zipper and flatten tube with zipper centered in the middle of the tube and bottom of zipper at the bottom of the flattened tube.
Turn tube inside out, and position the zipper in the middle of the tube as described above.
Sew 3/8 - inch seam across bottom of the tube.
Trim end of zipper.
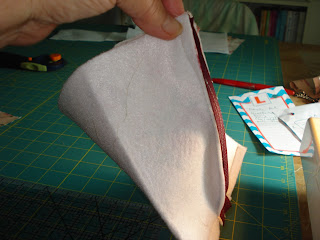
Grab top of pouch at the top of the zipper and refold pouch
along long edge of the top of the pouch with the zipper now on the side of the
pouch.
Unzip zipper about two inches and pin fabric edges to secure.
Flatten the rest of the edge and pin.
Fold ribbon in half and place raw edges even with edge of fabric
near the edge of zipper. Pin in place.
Sew 3/8 – inch seam along this edge. Double stitch over
ribbon ends to secure.
Trim corners, unzip zipper the rest of the way, turn right-side-out, push out corners, and press. You may need a steamer to get all the creases out of your pouch.
Here is the pouch after pressing.
To make the lining, fold back a 3/8-inch hem on both short edges of lining
fabric and press.
Fold tube right-sides-together with pressed edges of lining
fabric hem in center of the tube.
Stitch 3/8-inch seam along bottom of tube.
Grab the top of pouch at the top of the opening and refold pouch along long edge of the top of the pouch with the opening now on the side of the pouch.
Open out folded edges and stitch 3/8-inch seam along edges
of fabric.
Fold hem back, and press. Do not turn.
Unzip pouch and insert lining inside with hemmed edges along
zipper tape.
Pin in place and hand-stitch lining to bag along zipper.


Comments